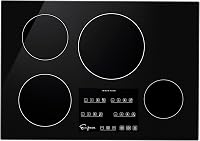
3 Best Built-In Induction Cooktops (October 2026)
The best built-in induction cooktops include the Empava Ease 24-Inch Built-In Induction Cooktop for small kitchens, the Empava Ease 30-Inch Built-In Induction Cooktop for timed meal prep, and the Frigidaire Gallery 30-Inch Induction Cooktop for cookware planning.
On this page (9 sections)
- Which built-in induction cooktop fits your kitchen?
- How do you measure for a built-in induction cooktop?
- What electrical work should you plan before buying?
- How do you match cookware to the cooking zones?
- Which controls matter for everyday cooking?
- How should you set up and use induction for the first week?
- How do you clean and protect the glass surface?
- What mistakes should you avoid when choosing a built-in model?
- Which built-in induction cooktop should you choose?
The Empava Ease 24-Inch Built-In Induction Cooktop is our top built-in induction cooktop pick for a small kitchen. Choose the Empava 30-inch for separate cooking timers, or the Frigidaire Gallery when known element sizes help you plan around existing cookware.
The right choice starts with your counter opening and electrical supply. After those checks, compare the pans you use together, how you adjust heat, and which cooking tasks need separate timers.
Our guide to choosing a built-in induction cooktop walks through installation fit. If you're still choosing between an installed surface and a movable burner, start with our complete induction cooktop guide.
Our picks at a glance
-
1
 Best for small kitchens
Empava Ease 24-Inch Built-In Induction Cooktop
7.3/10 our score
See it on Amazon -
2
 Best for timed meal prep
Empava Ease 30-Inch Built-In Induction Cooktop
7.1/10 our score
See it on Amazon -
3
 Best for cookware planning
Frigidaire Gallery 30-Inch Induction Cooktop
6.6/10 our score
See it on Amazon
Which built-in induction cooktop fits your kitchen?
Choose the Empava 24-inch for limited counter space, the Empava 30-inch for managing several cooking times, or the Frigidaire for matching pans to defined element diameters. None should go on your shortlist until its installation requirements fit your kitchen.
HeartyHatch compared dimensions, cooking controls, cookware planning, and safety features. The scores reflect those features and their fit for this roundup, with installation suitability taking priority over a small score difference.
| Product | Best for | Size | Dimensions (D x W x H) | Controls | Our score |
|---|---|---|---|---|---|
| Empava Ease 24-Inch Built-In Induction Cooktop | small kitchens | 24 in | 20.47 x 23.23 x 2.16 in | Digital touch | 7.3 |
| Empava Ease 30-Inch Built-In Induction Cooktop | timed meal prep | 30 in | 21 x 30 x 2.17 in | Digital touch | 7.1 |
| Frigidaire Gallery 30-Inch Induction Cooktop | cookware planning | 30 in | 21.38 x 30 x 2.88 in | Front capacitive touch | 6.6 |
Top built-in induction cooktop for a small kitchen
The Empava Ease 24-Inch suits cooks who need several cooking zones without devoting as much counter width to the appliance. It's the first model to consider for a compact kitchen where you usually cook with small and medium pots.
Empava Ease 24-Inch Built-In Induction Cooktop
- Four induction zones
- 9 heat levels
- Pan-size sensor
- Safety lock
Choose this compact four-zone model when counter space matters more than spreading out large pans. Match the zone layout to your usual cookware before committing to the smaller format.
Pros
- Four zones in a compact format
- Pan-size sensor with no-pan shut-off
- Hot-surface indicator and child control lock
Cons
- Hardwired installation needs electrical planning
- Compact format needs careful cookware spacing checks
Its four zones offer 9 heat levels, so you can move between gentle heating and a stronger boil using digital touch controls. A pan-size sensor detects cookware, and the element shuts off when no pan is present.
The “H” display warns that the surface remains hot, while the child control lock helps prevent unintended activation. These are useful safeguards around a busy counter, though hot pans still require attention.
The key buying question is usable pan space. Four marked zones don't guarantee room for your widest skillet beside a stockpot, so compare the zone positions with the pots you actually use together.
Choose it for meals built around a saucepan, a modest skillet, and smaller side dishes. Skip it if large cookware regularly crowds your current surface or your existing opening requires a larger appliance.
Empava identifies compatibility above its 24-inch and 30-inch under-counter single wall ovens. Confirm the exact oven pairing and clearances before treating that as a fit for your kitchen.
30-inch built-in induction cooktop for timed meal prep
The Empava Ease 30-Inch is the clearest choice here for cooks who manage several dishes with different finish times. Independent zone timers let you assign a countdown to each part of the meal.
Empava Ease 30-Inch Built-In Induction Cooktop
- Four induction zones
- Independent zone timers
- Power boost
- Child lock
Separate zone timers suit cooks managing several dishes with different finish times. Choose it for that cooking routine after confirming the cutout, wiring, and pan spacing.
Pros
- Independent zone timers with automatic shut-off
- Boost mode for faster heating
- Residual-heat display and overheating prevention
Cons
- Hardwired installation needs electrical planning
- Check zone dimensions before choosing it for large pans
The timers include automatic shut-off, which can end heating when a set duration expires. That helps with repeatable tasks, but you still need to check food and allow for heat retained in the cookware.
Boost mode provides extra power for heating, making it useful when bringing a pot of water toward a boil. Once the task changes to simmering or reducing a sauce, lower the setting instead of leaving boost engaged.
A pause function adds another control option, alongside the residual-heat display and overheating prevention. Read how pause and timer settings interact before relying on them during a meal.
Choose this model if separate countdowns would replace the collection of phone alarms you use while cooking. Its main advantage is coordinating tasks, rather than simply adding another zone.
Skip it if your kitchen needs the smaller format or if large griddle cooking drives your choice. Confirm the allowed cookware shapes and zone arrangement before planning to span more than one element.
30-inch built-in induction cooktop for cookware planning
The Frigidaire Gallery 30-Inch suits buyers who want to compare element sizes with their existing pans before choosing a cooktop. Its two 8-inch and two 7-inch elements give that comparison a clear starting point.
Frigidaire Gallery 30-Inch Induction Cooktop
- Two 8-inch and two 7-inch elements
- Auto pan detection
- Front capacitive touch controls
- 240V, 30-amp minimum circuit
Defined element diameters help you compare the cooking layout with your everyday pots. Front controls also suit buyers who want zone selection at the near edge of the cooktop.
Pros
- Two element sizes for cookware planning
- Auto pan detection
- Front capacitive touch controls with white display
Cons
- Requires a 240V supply and 30-amp minimum circuit
- Check cookware limits before choosing it for oversized pans
Measure the flat underside of your cookware rather than the rim across the top. A frying pan's advertised width can be larger than the base that sits over the element.
The front capacitive touch controls use a white display, keeping zone selection near the counter edge. Consider how your pan handles will sit around that control area when several pots are in use.
Auto pan detection senses cookware on the surface. It doesn't remove the need to check minimum pan sizes or confirm that a broad pan will heat as you expect.
Pick this model if its element layout matches the pans used for your everyday meals. Its 240V supply and 30-amp minimum circuit also give your electrician a specific starting point for planning.
Skip it if you need to accommodate unusually small cookware or a very large cooking surface without further checks. The element diameters alone don't establish every permitted pan size or cookware arrangement.
How do you measure for a built-in induction cooktop?
Measure the countertop cutout, support, and surrounding clearances, then compare them with the exact model's installation instructions. The outside width of the glass is not the required opening size.
Start with the opening beneath the glass
If you're replacing a cooktop, find the old installation documents or have the opening measured during removal. Measuring only the visible top can hide an opening that's too large, too small, or poorly supported for the replacement.
Record the opening's width and depth, the counter thickness, and any nearby joints. For a new counter, give the fabricator the chosen model's installation drawing before cutting begins.
A nominal size narrows the search, but it doesn't establish interchangeability. Our 30-inch induction cooktop guide and 24-inch induction cooktop guide help compare those size groups.
Check the cabinet below and the space above
Look beneath the opening for drawers, cabinet rails, an oven, or stored items that could conflict with the appliance or its required airflow. A thin glass top can still need substantial free space below the counter.
Check overhead cabinets, the backsplash, and the range hood against the installation requirements. Induction avoids a flame, but cooking still produces heat, steam, grease, and odors that ventilation needs to manage.
If an oven sits below, confirm approval for the exact appliance combination. Don't assume that a cooktop fitting into the counter means the oven and cooktop can share the cabinet safely.
Plan the replacement before removing the old appliance
Decide who will disconnect the old cooktop, alter the counter if needed, connect the replacement, and finish the installation. Agree on those tasks before delivery so a missing trade doesn't leave the kitchen unfinished.
An oversized opening may need a suitable support or countertop solution. Don't plan to let the glass bridge an unsupported gap or use sealant to make up for an incorrect cutout.
What electrical work should you plan before buying?
Have a qualified electrician confirm the required supply, circuit, and connection before ordering. Both Empava models use hardwired installation, so neither should be treated as a countertop burner you simply plug into a nearby outlet.
A breaker label alone doesn't establish that the circuit is suitable. The electrician needs to check the wiring, connection point, grounding, and model-specific installation requirements.
Don't size a circuit from total wattage alone
Total appliance power doesn't tell you everything needed to choose wiring or a breaker. Follow the installation instructions and applicable electrical requirements rather than calculating a circuit from one advertised number.
The presence of a power cord also doesn't establish a standard plug connection. Confirm how the appliance must connect before arranging cabinetry or closing access to the junction area.
Our explanation of induction burner amps and outlet limits covers useful electrical basics. Use the built-in model's own instructions for the final installation requirements.
Budget for the work around the appliance
Include electrical work, counter changes, removal, and any cookware replacements in your project budget. Those items can change which cooktop makes sense more than a small difference in features.
For a fuller breakdown of the expenses to plan around, read our guide to induction cooktop costs. Get the installation scope settled before committing to an appliance that needs major changes.
How do you match cookware to the cooking zones?
Choose magnetic, flat-bottomed cookware that meets the cooktop's size requirements. Then check how your usual combination of pots fits across the surface.
Check the base material and diameter
Hold a magnet against the underside of each pan as an initial compatibility check, and look for an induction symbol or cookware instructions. Aluminum, copper, and glass need a suitable magnetic base to work directly on induction.
Stainless steel varies, so don't assume every stainless pot will work. Check small saucepans, kettles, and specialty pans as carefully as your main skillet.
Measure the flat base that rests on the cooktop, not the wider rim. Our guide to pan size and induction burner size explains why that distinction matters.
A pan-detection system can reject cookware that's too small or unsuitable. Moving an incompatible pan to another zone won't correct the base material.
Think about the pans you use together
Write down a typical meal and the cookware it needs. A large skillet, pasta pot, and saucepan make a more useful planning exercise than simply counting four zones.
Compare base sizes, handle directions, and access to the controls. Leave enough room to lift a pot without knocking another pan or reaching awkwardly across a hot handle.
A broad pan may extend beyond the strongest heating area, so its edges can behave differently from its center. Thick cookware can spread heat, but it doesn't turn a small element into a larger one.
Don't assume adjacent zones form a bridge area. For a griddle or long roasting pan, confirm that the instructions allow the intended placement and cookware shape.
Which controls matter for everyday cooking?
Choose controls you can understand quickly and timers that match your routine. A useful control system lets you select the intended zone, change its heat, and confirm the setting without confusion.
Separate countdowns help with different finish times
Independent timers are useful when one pan needs a short simmer while another cooks longer. They're less valuable if you usually prepare one-pot meals and adjust everything by sight.
Learn whether a timer sounds an alert, switches off a zone, or offers both behaviors. On the Empava 30-inch, the independent countdowns include automatic shut-off, so plan for the heating to end.
A timer controls duration, not doneness. Pan material, food quantity, starting temperature, and lid use can all change how long a dish needs.
Heat levels need a little adjustment
Numbered power levels describe settings, not guaranteed food temperatures. Start with moderate heat and adjust after seeing how your pan responds.
For delicate sauces, a heavy pan and careful stirring can matter as much as the number of settings. If precise temperature control is central to your cooking, confirm the available control modes before buying.
Touch controls also need clear access. Keep the control area clean and dry, and avoid resting utensils or towels over it.
Safety features support careful cooking
A child lock helps prevent unintended control changes, while a residual-heat indicator warns about heat left in the surface. Neither makes a hot pan safe to touch.
Pan detection also has limits: removing a pan can stop heating, but it doesn't cool the cookware. Turn the zone off when finished and move handles away from the counter edge.
How should you set up and use induction for the first week?
Start with clean cookware, moderate settings, and familiar recipes. Learning how quickly your pans respond is easier with a routine meal than with several unfamiliar dishes at once.
Prepare the surface and controls
After installation, remove packaging and follow the first-use instructions before cooking. Check that the controls respond and that you understand zone selection, locking, and shut-off.
Clean pan bottoms before setting them down. Grit trapped beneath cookware can scratch the surface when a pan moves.
Center the pan over its zone and add food or liquid before applying strong heat, following the cookware's instructions. Avoid leaving an empty pan on high heat while you prepare ingredients.
Adjust heat before food gets ahead of you
Use boost for tasks that benefit from rapid heating, then reduce the setting when that stage ends. A pot approaching a full boil needs attention even if a timer is running.
For frying, start lower than you might with a slower electric surface. Watch the oil and food, then raise the heat in small steps if needed.
When you lower the setting, the pan still holds heat. Heavy cookware can keep a sauce bubbling after the electrical input drops, so stir or move the pan as the recipe requires.
Learn which sounds need attention
Fans, cookware vibration, and a hum can occur with induction, and the sound can change with pan construction or power level. A properly centered pan is a sensible first check when a noise appears.
Our guide to induction cooktop noise explains common causes. Stop using the appliance and follow its service guidance if a sound comes with an error, damage, or abnormal operation.
How do you clean and protect the glass surface?
Clean spills after the surface has cooled enough for the approved cleaning method, and lift cookware rather than sliding it. Induction glass still needs care because hot pans transfer heat back into the surface.
Use the cleaner and tools allowed in the manual. Avoid abrasive pads, gritty cleaning powders, and improvised scraping tools that can mark the glass.
Deal with spills according to the manual
Remove food residue regularly so it doesn't collect beneath the next pan. Some spills, including sugary mixtures and melted plastic, may need prompt attention under specific instructions.
Keep the control area free of pooled water and wipe away cleaner residue. Don't flood the surface or let liquid collect around its edges.
For stubborn deposits, use a scraper only if the manufacturer allows one and follow the stated method. Pressing harder with an unsuitable tool can turn a cleaning task into permanent damage.
Keep the surface clear between meals
Don't use the glass as a chopping board or a place to drop heavy cookware. Store heavy objects where they won't fall onto the cooktop.
Avoid placing lids, foil, or loose utensils over active zones or controls. A clear surface makes it easier to see which pan belongs to each zone and spot spills early.
Use a mat or protector during cooking only when the cooktop instructions expressly allow it. An accessory shouldn't block ventilation, interfere with controls, or hide heat warnings.
What mistakes should you avoid when choosing a built-in model?
Avoid choosing by nominal width, zone count, or boost power alone. Each leaves out a practical limit that can affect installation or daily cooking.
- Ordering before measuring: a familiar width doesn't confirm the cutout, support, or clearance.
- Assuming four zones fit four large pans: base spacing and handle access matter as much as the number of circles.
- Keeping incompatible cookware: check your main skillet and smallest saucepan before planning the switch.
- Treating timers as food sensors: elapsed time doesn't confirm that a sauce has thickened or meat has finished cooking.
- Using maximum heat for every task: boost can overshoot a gentle cooking stage and overheat an empty pan.
- Ignoring access below the counter: wiring, ventilation, drawers, and ovens all need room.
If your kitchen fails a fit or electrical check, resolve that issue before comparing more features. A suitable installation gives you a stronger starting point than choosing a model and hoping the space can adapt.
Which built-in induction cooktop should you choose?
Choose the Empava Ease 24-Inch when preserving counter space matters and your regular cookware fits its layout. Choose the Empava Ease 30-Inch when separate cooking timers would help you coordinate meals.
Pick the Frigidaire Gallery 30-Inch when its known element sizes match your pans and its front controls suit your reach. Confirm cookware limits for any unusually small pot or oversized pan before ordering.
Your final built-in induction cooktop decision should pass three checks: the installer approves the fit, the electrician approves the connection, and your everyday pans fit the cooking layout. Once those are settled, choose the controls that suit how you cook.
If you're still deciding on the heating system itself, our induction versus electric cooktop guide explains the differences that matter during a kitchen replacement.
Our top 3 picks at a glance
-
1
Best for small kitchens
Empava Ease 24-Inch Built-In Induction Cooktop
7.3/10 our score
See it on Amazon -
2
Best for timed meal prep
Empava Ease 30-Inch Built-In Induction Cooktop
7.1/10 our score
See it on Amazon -
3
Best for cookware planning
Frigidaire Gallery 30-Inch Induction Cooktop
6.6/10 our score
See it on Amazon
Frequently asked questions
What is the best built-in induction cooktop for most kitchens?
The Empava Ease 24-Inch is our top pick for a compact kitchen, while the Empava Ease 30-Inch suits cooks who want separate zone timers. Choose by installation fit first: a higher score does not make a smaller model the right replacement for your existing opening.
Do built-in induction cooktops need special wiring?
Built-in induction cooktops need a circuit and connection that meet their installation instructions. Both Empava models here require hardwired installation, and the Frigidaire specifies 240V with a 30-amp minimum circuit.
Have a qualified electrician check your wiring, breaker, and connection before you order or arrange installation.
How do I know whether a 24-inch or 30-inch cooktop will fit?
Compare your countertop opening with the required cutout dimensions in the exact model's installation instructions. Also check counter thickness, support, ventilation, and clearances above and below.
Overall glass dimensions describe the appliance, not the hole it needs, so matching the old cooktop's width is only a starting point.
What cookware works on a built-in induction cooktop?
Use cookware with an induction-compatible magnetic base that meets the cooktop's minimum pan-size requirements. A magnet sticking firmly to the bottom is a useful first check, but also confirm the cookware label.
Stainless steel varies, and a compatible pan still needs a flat base and suitable size.
Can you install an induction cooktop above a wall oven?
You can install some induction cooktops above a wall oven when both appliances' instructions allow the combination and required clearances are met. Empava identifies its 24-inch model as compatible above Empava 24-inch and 30-inch under-counter single wall ovens.
Confirm the exact oven model, ventilation, and installation dimensions before proceeding.