Duxtop 9600LS vs 9100MC: Which Is Better? (October 2026)
The Duxtop 9600LS wins for small kitchens and longer cooking sessions in this Duxtop 9600LS vs Duxtop 9100MC comparison. Choose the 9100MC if you prefer push buttons and a large display.
On this page (11 sections)
- Duxtop 9600LS vs Duxtop 9100MC: what actually changes?
- Which Duxtop burner has the better controls?
- When is the longer timer worth choosing?
- How much counter and storage space do they need?
- Will your cookware work with either model?
- How should you set up either Duxtop before cooking?
- How do you get useful heat control without scorching food?
- Which mistakes are easiest to avoid?
- Which one is easier to clean and care for?
- When does the ChangBERT make more sense?
- Which Duxtop should you choose, and who should skip both?
Choose the Duxtop 9600LS for smaller spaces and longer cooking sessions, or the 9100MC if you prefer push buttons and a large display. In this Duxtop 9600LS vs Duxtop 9100MC comparison, the deciding factors are controls, timer length, and fit.
Both are single-burner induction cooktops with the same available power and temperature ranges. Spend your attention on the differences you'll use during dinner, rather than expecting one to offer more heat simply because it has more convenience features.
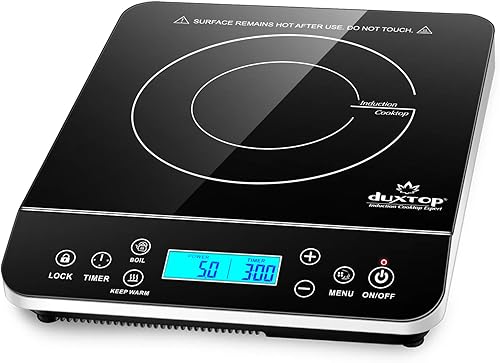

Duxtop 9600LS vs Duxtop 9100MC: what actually changes?
The 9600LS offers more control features in a smaller body, while the 9100MC serves buyers who want a push-button panel. Neither has a higher maximum power setting.
| Feature | Duxtop 9600LS | Duxtop 9100MC |
|---|---|---|
| Power settings | 20, from 100 to 1800 W | 20, from 100 to 1800 W |
| Temperature settings | 20, from 100 to 460 °F | 20, from 100 to 460 °F |
| Controls | Touch panel with LCD display | Push-button panel with large display |
| Timer | Up to 10 hours | Up to 170 minutes |
| Dimensions, depth x width x height | 11.4 x 14 x 2.5 in | 12.7 x 16.3 x 3.8 in |
| Weight | 6.2 lb | 6.2 lb |
| Cookware requirement | Magnetic bottom at least 5 in across | Magnetic bottom at least 5 in across |
| Electrical connection | 120 V, 15 amp outlet | 120 V, 15 amp outlet |
Shared setting ranges don't establish equal results with every pan or recipe. Pan construction, the amount of food, and your heat adjustments still affect browning, simmering, and boilovers.
For the basics behind those differences, our complete induction cooktop guide explains how induction heats cookware and what makes a suitable kitchen setup.
Duxtop 9600LS vs 9100MC: which differences deserve priority?
Start with control preference and available space, then consider the timer. Those are useful differences even if you cook the same few meals every week.
For a burner stored after dinner, the smaller body may matter every day. For a burner that stays on a roomy counter, buttons you like using may matter more than dimensions.
Treat the longer countdown as a feature for recipes you already make. It adds little if your burner mainly handles eggs, pasta, or a quick side dish.
Which Duxtop burner has the better controls?
Choose the 9600LS for touch controls and dedicated shortcuts, or the 9100MC for push buttons and a large display. The better panel is the one you can use comfortably while watching the pan.
The 9600LS includes a child safety lock, fast boil button, and keep warm button. Its keep warm function runs for 1 to 30 minutes at 140 °F, making it useful for a short gap between finishing a dish and serving it.
The lock prevents accidental changes to cooking and timer settings once they're set. It doesn't make the pan safe to touch or remove the need to supervise children near the cooking area.
The 9100MC is a sensible choice if you consistently prefer pressing separate buttons over touching a panel. Look at the control layout and consider how you'd change heat, set a countdown, and stop cooking.
Don't choose touch controls simply because they look newer. If you dislike that style on other appliances, the 9600LS shortcuts may not outweigh a control panel you'll use less comfortably.
When is the longer timer worth choosing?
The 9600LS makes more sense for recipes that regularly run beyond the 9100MC's 170-minute limit. For shorter meals, the extra countdown range is unlikely to change how you cook.
A long countdown can keep a soup or stock session within one timer setting. You'll still need to check liquid levels, stir as needed, and adjust the heat as the contents reduce.
The long cooking timer and the brief keep warm function serve different jobs. Don't choose a warming shortcut when a recipe needs active cooking, and don't assume a long countdown can manage the food for you.
Set timers around useful checkpoints, such as when to stir or check tenderness. A shorter reminder can be more helpful than setting the full recipe time and waiting until the end to look at the pot.
The 9100MC suits cooks whose burner work usually ends within a meal-prep session. If longer recipes are rare, decide whether resetting a countdown occasionally is enough reason to change your preferred controls.
How much counter and storage space do they need?
The 9600LS is easier to fit into a tight kitchen because it's smaller in every dimension. Both weigh the same, so its advantage is space rather than a lighter load.
Measure the working area with your usual pan nearby. You need room for the burner, a secure pan position, the handle, and a place to put a hot lid or cooking spoon.
The body measurements in the table aren't the required operating clearances. Follow the manual for ventilation space, and avoid wedging either unit between other appliances or against a wall.
Check storage height as well as shelf width. A burner that fits on the counter may still be awkward to put away beneath a low shelf or inside a shallow cabinet.
Neither model's overall width tells you how broadly it heats a pan. The 9100MC's larger glass surface isn't a reason to assume it will brown the edges of a wide skillet more evenly.
Will your cookware work with either model?
Both need a magnetic cookware base at least 5 in across, so check your existing pans before choosing a burner. Replacing unsuitable cookware can be a bigger change than learning a new control panel.
Hold a magnet against the bottom, then measure the flat base that contacts the cooktop. A pan's advertised diameter often describes its top rim, which can be wider than the part that matters for induction.
Cast iron and magnetic stainless steel can work, while a stainless steel label alone doesn't confirm compatibility. Check each pan separately, especially if your cookware comes from several sets.
A flat, stable base helps the pan sit securely. Center it on the cooking area and keep handles positioned so they won't be knocked as you move around the counter.
Both Duxtop models shut off after 60 seconds when no cookware or unsuitable cookware is detected. If heating stops, check compatibility and centering before repeatedly restarting the burner.
Meeting the minimum diameter doesn't establish the largest suitable pan. Use the induction burner and pan size guide to separate base fit, pan support, and useful heating area.
How should you set up either Duxtop before cooking?
Start with a stable surface, clear ventilation, and the right electrical connection. A good setup gives you room to handle hot cookware without stretching across the burner.
Place the unit on a level, heat-resistant surface and follow its manual for clearances. Keep towels, packaging, and loose items away from air openings and the hot pan.
Both models use a household outlet, but several outlets can share one circuit. Avoid running another high-power appliance, such as a kettle or toaster oven, on that circuit while the burner is drawing substantial power.
Use the connection method specified in the manual rather than assuming a power strip or extension cord is suitable. Our outlet guide for induction burners explains circuit load and what to check at the cooking spot.
Before the first meal, learn how to switch modes, change heat, set the timer, and turn the unit off. Our guide to using a portable induction cooktop walks through those basic habits.
How do you get useful heat control without scorching food?
Use power mode to adjust cooking intensity, and treat temperature mode as a setting that still needs your attention. Neither mode removes the need to watch the food and respond to the pan.
Power mode is useful when you want to increase or reduce heat directly. Bring a pot toward a boil, then lower the setting once it reaches the cooking stage you need.
For frying or sautéing, avoid starting an empty pan at maximum power. Induction can heat compatible cookware quickly, so begin conservatively and follow the pan manufacturer's guidance, especially with nonstick cookware.
A selected temperature isn't a measurement of the center of your food. Use an appropriate food thermometer when doneness or safe cooking temperature matters.
For a simmer, watch the liquid after each adjustment and allow time for the pan to respond. A thick pot holds heat differently from a thin skillet, so a setting that suits one may be too strong for another.
Neither model gains a clear delicate-cooking advantage from the shared settings alone. If your main task is melting chocolate or handling another heat-sensitive food, use a suitable gentle method such as a water bath.
Which mistakes are easiest to avoid?
Avoid oversized expectations, unsuitable pans, and constant high heat. Most buying and cooking errors come from treating a portable burner as if its body size or display tells you everything about its heating area.
- Buying for the glass size: A broad top doesn't prove that the whole base of a large pan receives equal heat.
- Measuring the rim: Check the magnetic base rather than the pan's widest point.
- Leaving boil power unchanged: Reduce heat once water boils or food reaches the desired cooking stage.
- Overloading one circuit: Consider other appliances using the same circuit, even when they're plugged into different outlets.
- Treating the timer as supervision: Stay available to check food, liquid levels, and pan position.
Some induction cookware can make a high-pitched sound, particularly when its base contains several metal layers. That sound alone doesn't mean choosing the other Duxtop would solve the issue.
If noise becomes distracting, our guide to induction cooktop noises explains common causes and useful checks. Stop using the unit if it shows an error or behaves abnormally, and follow its instructions.
Which one is easier to clean and care for?
Both have glass cooking surfaces that need cooling before cleaning. The practical care routine is similar, so cleaning shouldn't be the main reason to choose one over the other.
Heat transfers back from the cookware into the glass. A burner can therefore remain hot after you remove the pan, even though induction doesn't use an exposed glowing coil.
Once the unit has cooled, wipe away food and grease with a soft damp cloth using the method allowed by its manual. Don't assume spills can't stick simply because there's no flame.
Avoid pouring cleaner or water over the control panel or into ventilation openings. Use only approved cleaning products and tools, since abrasive pads can damage a cooking surface.
Lift heavy cookware instead of dragging it across the glass. Keep pan bottoms clean too, because grit beneath a pot can scrape the surface as you reposition it.
Before storage, let the burner cool and dry fully. Leave the cord loosely arranged rather than trapping it beneath the unit or bending it sharply around the body.
When does the ChangBERT make more sense?
Consider the ChangBERT for frequent cooking when continuous-duty circuitry and a metal housing are priorities. It offers a third route for buyers who want push buttons and a long countdown.
Its 9 power levels span 200 to 1800 W, while its 18 temperature settings span 120 to 460 °F. That gives you fewer preset choices and higher minimum settings than either Duxtop.
ChangBERT describes its circuitry as designed for continuous use and identifies the unit as NSF certified. Its stainless steel housing and 10-hour timer are relevant features for a busy cooking station.
Those features don't make it the best choice for every home kitchen. If you want more setting choices or the 9600LS convenience buttons, either Duxtop may fit your routine better.
ChangBERT provides a 2-year limited warranty for home use and a 1-year limited warranty for commercial use. Match the warranty to your intended use rather than assuming the same coverage applies in both settings.
For alternatives beyond these 3 burners, see our best portable induction cooktops guide.
Which Duxtop should you choose, and who should skip both?
For Duxtop 9600LS vs Duxtop 9100MC, choose around your working space and control habits first. Use the timer difference to settle the choice when long recipes are part of your normal routine.
Pick the 9600LS if you put the burner away often, have limited counter room, or want shortcuts for boiling and brief warming. Skip it if touch controls are a daily annoyance and you have enough space for the alternative.
Pick the 9100MC if push buttons and a large display suit you better, and most cooking sessions fit within its countdown. Skip it if the larger body makes your counter cramped or longer timed cooking is a regular need.
Skip both if you need 2 pans heating at once or want to keep using cookware that isn't induction compatible. Neither extra timer range nor a preferred panel solves those needs.
Before ordering, measure your cooking spot and check the base of the pan you'll use most. Then read how to choose a portable induction cooktop for broader selection help, or the Duxtop 9600LS review for a closer look at that model.
Frequently asked questions
What is the main difference between the Duxtop 9600LS and 9100MC?
The main differences are controls, timer length, and size. The 9600LS has touch controls, a countdown up to 10 hours, and a smaller body; the 9100MC has push buttons and a countdown up to 170 minutes.
Their power and temperature ranges match, so choose around your cooking habits and available space.
Do the Duxtop 9600LS and 9100MC use the same cookware?
Yes, both require induction-ready cookware with a magnetic bottom at least 5 in across. Check the flat base rather than the pan's rim, and make sure a magnet sticks firmly underneath.
A wide pan with a small magnetic center still needs closer attention to base size and fit.
Which Duxtop model is smaller?
The 9600LS is smaller at 11.4 x 14 x 2.5 in, compared with 12.7 x 16.3 x 3.8 in for the 9100MC, measured depth, width, and height. Both weigh 6.2 lb, so the smaller model saves space without reducing carrying weight.
Allow additional room for ventilation and pan handles.
Can you use either Duxtop burner on a standard outlet?
Both are designed for a 120 V, 15 amp outlet, but the other appliances sharing that circuit matter too. Avoid running another high-power appliance on the same circuit while cooking, and follow the model's connection instructions.
Our guide to induction burner amps explains what to check before use.
Is the Duxtop 9600LS better than the 9100MC?
The 9600LS is the better choice for limited counter space, longer countdowns, and dedicated cooking shortcuts. Choose the 9100MC if push buttons and a large display matter more to you.
Neither gains an advantage in maximum wattage or available temperature range, so those shared specs shouldn't decide your choice.


