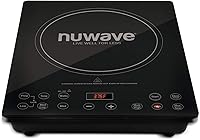
ChangBERT Induction Cooktop Review: Worth It? (October 2026)
The ChangBERT Enhanced induction cooktop suits frequent cooks who prefer physical buttons. Choose it for quick-access controls and a longer timer; choose the Commercial model for simpler needs or the Duxtop 9600LS for more setting choices.
On this page (9 sections)
- What does the ChangBERT Enhanced induction cooktop offer?
- How does the Enhanced compare with the Commercial model and Duxtop?
- Is the Enhanced version worth choosing over the Commercial?
- What size pan works with its heating coil?
- How much counter space and electrical capacity does it need?
- How should you set it up for everyday cooking?
- Which common mistakes should you avoid?
- How do you keep the surface clean?
- Which ChangBERT induction cooktop should you choose?
The ChangBERT Enhanced induction cooktop is a good fit for frequent cooks who want physical buttons and quick heat-setting shortcuts. Its main appeal is how you control it during a busy meal, rather than a higher maximum output than the alternatives here.
Choose it as an extra cooking station for meal prep, a compatible countertop setup or an RV with enough electrical capacity. If you're still deciding which features matter, compare the best portable induction cooktops alongside this review.
What does the ChangBERT Enhanced induction cooktop offer?
The Enhanced gives you a single cooking zone with quick-access controls and a longer timer. It suits a cook who often moves from heating water to a gentle simmer and wants clear, direct controls.
ChangBERT Enhanced Portable Induction Cooktop

- 1800 W maximum
- 8-inch heating coil
- 9 power levels
- 12-hour timer
Quick-access buttons and a dual display suit cooks who switch between boiling, simmering and holding food. Choose it when fewer button presses matter during daily meal prep.
Pros
- Dedicated BOIL and KEEP WARM controls
- Settings and timer visible together
- Sealed control panel
- ChangBERT identifies it as NSF certified
Cons
- Fewer setting choices than the Duxtop
- One cooking zone limits full-meal cooking
Its 8-inch heating coil sits beneath a glass cooking surface, with stainless steel construction around it. ChangBERT identifies the burner as NSF certified and built with continuous-duty circuitry for frequent use.
The useful distinction is the control layout: dedicated BOIL and KEEP WARM buttons reduce the steps needed to reach common functions. A dual digital display lets you read the selected power or temperature alongside the timer.
ChangBERT backs it with a 2-year limited warranty for home use and a 1-year limited warranty for commercial use. That difference matters if you're buying a burner for paid food service rather than your kitchen.
This model makes sense when you regularly use a separate burner and value those controls each time. Skip it if you need two pans cooking together or mainly want more adjustment choices between heat settings.
How do the ChangBERT induction cooktop's controls work?
Choose power mode for direct heat adjustment or temperature mode when a target setting better suits your task. The Enhanced offers 9 power levels from 200 to 1800 W and 18 temperature settings from 120°F to 460°F.
The one-click maximum-power button is useful when bringing a pot of water toward a boil. Reduce the setting once boiling starts, since continued maximum power can waste water through evaporation and increase splashing.
A selected temperature isn't a direct reading of every part of your food. Stir sauces, watch the simmer and use a food thermometer when doneness matters.
The KEEP WARM shortcut helps with serving, but it doesn't replace checking food temperature. Choose a setting that suits the food and follow safe holding guidance.
How does the Enhanced compare with the Commercial model and Duxtop?
Choose the Enhanced for shortcuts, the Commercial for routine push-button cooking, or the Duxtop for more selectable settings. None gives you a second cooking zone, so the decision starts with how you cook one pan at a time.
| Your priority | Strongest fit | Main reason to choose something else |
|---|---|---|
| Quick changes during meal prep | ChangBERT Enhanced | The extra controls won't help much if you rarely change settings |
| Repeated tasks with physical buttons | ChangBERT Commercial | The Enhanced makes common functions quicker to reach |
| More adjustment choices | Duxtop 9600LS | A touch panel may not suit your preferred control style |
| Reading heat and time together | ChangBERT Enhanced | This matters less for short, closely watched tasks |
The Commercial model suits batch cooks who repeat familiar tasks and don't need the Enhanced model's shortcuts. Both ChangBERT burners share the same core power and temperature ranges, so the Enhanced isn't an upgrade in maximum heat.
Choose the Commercial for a regular soup pot, pasta station or other single-pan routine where you set the heat and make occasional changes. Skip it if the extra timer range or simultaneous display of time and heat is central to your workflow.
The Duxtop suits cooks who want more adjustment choices, with starting settings of 100 W and 100°F. Those lower starting points are useful buying distinctions for gentle cooking, though the pan and food still affect the result.
Its control lock helps prevent accidental setting changes once engaged. Skip it if tactile buttons are a firm preference or you specifically want either ChangBERT model's stated coil size.
The Duxtop 9600LS review covers that alternative in more detail. For another commercial-style option, compare the Nuwave Pro Chef cooktop.
Is the Enhanced version worth choosing over the Commercial?
Choose the Enhanced when its controls save steps in your normal cooking routine. Its timer runs up to 12 hours, compared with 10 hours on the Commercial and Duxtop.
That extra range matters for extended cooking sessions, but it offers little benefit if most meals take less than an hour. Don't make the timer the deciding feature unless you can name a task that needs it.
The Enhanced also has a sealed control panel, which is useful around splashes. Sealing doesn't make the appliance waterproof, so wipe the controls rather than rinsing them.
For a shared kitchen, consider who will use the burner and how easily they can read and change settings. Straightforward controls matter more than features that stay unused.
What size pan works with its heating coil?
Choose cookware by its magnetic base and the manual's allowed dimensions, not by matching the pan's name to the coil size. A wide frying pan may have a much smaller flat base than its rim suggests.
Hold a magnet against the underside to check for magnetic material. Cast iron and some stainless steel cookware work with induction; plain aluminum, copper and glass need a compatible magnetic base.
A magnet check is a useful first step, but the base must also meet the cooktop's size and placement guidance. Center the pan so it sits securely without covering controls or blocking ventilation.
A large pan can extend beyond the main heated area. Thick, well-made cookware can spread heat, but stir food and watch for uneven browning instead of assuming the whole base receives equal heat.
ChangBERT says both models support up to 100 lb. That capacity doesn't make an oversized or unbalanced pot suitable, and you should account for the combined weight of cookware, food and liquid.
Read our guide to induction burner and pan size before buying a wide skillet or stockpot for this burner.
How much counter space and electrical capacity does it need?
Allow room for the burner, ventilation and safe pan handling. Both ChangBERT models measure 15 in deep by 12.2 in wide by 2.8 in high and weigh 6.1 lb.
Measure the usable counter with a pan in place, including its handle. A burner that fits beneath a cabinet may still leave too little space to lift a lid or pour from a tall pot.
Use a level, dry, heat-resistant surface and follow the manual's clearances. Keep air openings clear of towels, loose packaging and nearby objects.
The Enhanced runs on 120 V and reaches 1800 W, so check what else shares the circuit. A kettle, toaster or microwave running at the same time can add a substantial load.
For an RV or portable power setup, check both continuous output and available energy capacity. Supporting the burner briefly and powering a full cooking session are different requirements.
Our induction burner wattage guide explains how power settings relate to cooking and electrical demand. Use an outlet and connection method approved by the cooktop instructions.
How should you set it up for everyday cooking?
Start with a compatible pan, a clear work area and a moderate setting. Learn how your cookware responds before using maximum power for tasks that can scorch quickly.
Place the burner where you can reach the controls without leaning over steam. Turn pan handles away from counter edges and leave space nearby for a hot lid.
For your first meal, choose something easy to observe, such as water for pasta or a simple soup. Watch how quickly it heats, then lower the setting and learn which level maintains the simmer you want.
Add ingredients and adjust heat with the pan's behavior in mind. Induction responds quickly to setting changes, but a heavy pot can retain heat after you turn the power down.
Don't preheat an empty pan at maximum power. Use a lower setting for oil, butter and delicate ingredients, then increase heat as the recipe requires.
For a step-by-step introduction, follow our guide to using a portable induction cooktop.
Which common mistakes should you avoid?
Avoid treating a temperature setting as a guarantee of food temperature. The contents, pan material, amount of liquid and stirring all affect what happens inside the pot.
Don't choose maximum power for every task. High output helps heat water, while sauces, eggs and small portions usually need closer control to prevent scorching.
Don't leave a long simmer unchecked because the timer is running. Liquids can reduce, food can stick and the cooking conditions can change well before the countdown ends.
Keep small metal items away from the cooking area. Auto-pan detection and other protective features support normal use, but they don't replace a clear workspace.
Finally, plan the meal around one cooking zone. If you need vegetables, sauce and pasta ready together, prepare some items ahead or use the burner alongside another cooking appliance.
Our complete induction cooktop guide helps you decide whether a portable single burner matches your broader kitchen needs.
How do you keep the surface clean?
Let the burner cool, then wipe the glass and controls with a soft cloth using the care method in the manual. Remove greasy film and food residue before the next cooking session.
Heat from the pan can leave the glass hot after cooking stops. Heed the hot-surface indicator and don't assume the surface is cool because induction heats the cookware directly.
Avoid abrasive pads, harsh scraping and excess water around the appliance. Lift cookware when moving it rather than dragging a rough base across the glass.
Check the pan's underside for stuck-on food before placing it on the burner. A clean, dry base helps keep residue off the cooking surface.
Inspect ventilation openings as part of routine care and keep them clear according to the manual. Let any cooling cycle finish before moving or storing the appliance.
If you're considering a protective layer, first confirm that the cooktop instructions allow it. Our induction cooktop mat guide explains the fit and heat concerns to check.
Which ChangBERT induction cooktop should you choose?
Choose the ChangBERT Enhanced if you frequently change cooking modes and want clear, direct controls. Its shortcuts earn their place when boiling, simmering and holding food are regular parts of your routine.
Pick the ChangBERT Commercial if you prefer physical buttons and your cooking doesn't need the Enhanced conveniences. It covers the same core heat range without making the longer timer a reason to buy.
Choose the Duxtop 9600LS if more setting choices and lower starting settings matter most. Its touch controls and control lock make it a different fit from either ChangBERT.
Before ordering, settle three questions: does your main pan fit, can the circuit support the load, and will one cooking zone handle your meals? If those answers point toward a different model, compare the best induction burners next.
Frequently asked questions
Is the ChangBERT Enhanced induction cooktop worth considering?
Yes, choose the Enhanced if quick-access buttons and a timer that runs up to 12 hours fit your cooking routine. Its dual display helps you read the heat setting and remaining time together.
Choose the Commercial model if those conveniences won't change how you prepare meals.
What cookware works with the ChangBERT induction cooktop?
Use induction-compatible cookware with a magnetic, flat base that meets the manual's size guidance. Check the underside with a magnet and measure the base rather than the rim.
The coil diameter alone doesn't define the allowed pan sizes or ensure even heat across a much wider pan.
Does the ChangBERT Enhanced have a longer timer than the other models?
Yes, its timer runs up to 12 hours, while the ChangBERT Commercial and Duxtop 9600LS timers run up to 10 hours. The extra range helps only if your cooking needs it.
Check liquid levels and monitor food throughout cooking; a countdown timer doesn't replace supervision.
Can you use the ChangBERT Enhanced in an RV?
Yes, provided the RV's electrical supply can support the burner and any other loads running with it. The Enhanced uses 120 V and reaches 1800 W at maximum power.
Check the outlet, circuit and inverter limits before cooking, and follow the RV and cooktop instructions.